Using WebSockets with NetTalk
by Unknown user
Websockets are connections between a client and a webserver. The client can create a regular request to a webserver (an HTTP GET) and request to upgrade the connection to a bidirectional TCP connection. That connection will then remain open for as long as you want.
Such an open connection to a webserver offers a way for the server to send information to the client whenever it wants to. There are other techniques to receive messages from the server (long polling, ajax requests on a timer) but none of those have the same fluency as websockets do. Since the connection is already open and the websocket-protocol requires very little overhead, the server can send messages to the client very quickly.
It's important to understand that a websocket connection can only be initiated by the client using a normal GET request. All major browsers support websockets (http://caniuse.com/#search=websockets) - opening a websockets is done by just three lines of JavaScript. After a websocket connection is open, both sides can send messages whenever they want.
NetTalk webserver can be extended to support websockets. In this article I'll show you exactly how that's done.
Amsterdam Taxi service
I'll start with a demo to illustrate some of the possibilities of websockets. Imagine that you're running a taxi service in the center of Amsterdam. All taxis are equipped with a GPS enabled smart phone. Using websockets, those devices can send their location every second without overloading the webserver because the websocket protocol hardly has any overhead.
Using websockets, the server can broadcast the new position of each taxi to all connected devices. That way, all taxis can see each others positions.
Let's see this in action. Open http://taxi.indirection.nl:89/ in a webbrowser.

Click sign in and enter your name and the number of seats in your taxi. The password is 'websockets'.
You'll be returned to the map and in the left upper corner a taxi will appear with a red dotted border. You can now drag your taxi over the map.
Open up a different browser (or a private browsing tab) and go to the same url. Your taxi will appear and its position will be updated as soon as you move the taxi in the different browser. It's important to understand that there is no direct communication between the two browser instances. All communication is between the browser and the server, just like in regular websites.
The taxi server wouldn't be complete without the ability of picking up rides, right? So change the url of the second browser window you opened to http://taxi.indirection.nl:89?dispatch=1.
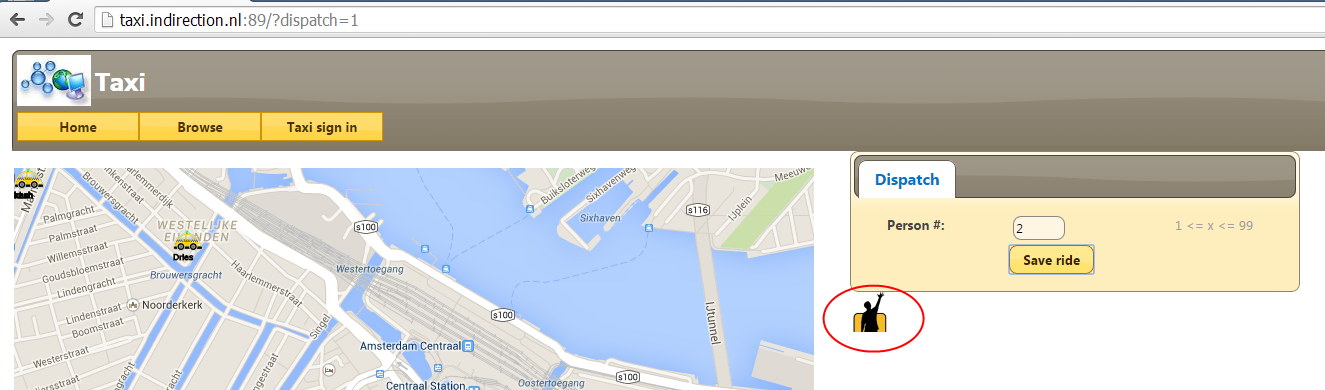
Enter the number of people that are waiting on a ride and hit the 'Save ride' button. An icon appears that you can now drag onto the map. As soon as the icon is placed on the map, the position of the icon is broadcast to all connected clients that are logged in as a taxi and have enough seats in their taxi to accommodate the amount of people waiting for this ride.
The fluency of this interface can only be achieved by websockets. It goes without saying that when taxis move around through the city, having the positions update as often as possible is a must have.
So, how does it work?
The taxi app is a regular NetTalk webserver application, extended with websocket capabilities. Below I'll explain extactly how the taxi application uses those websockets.
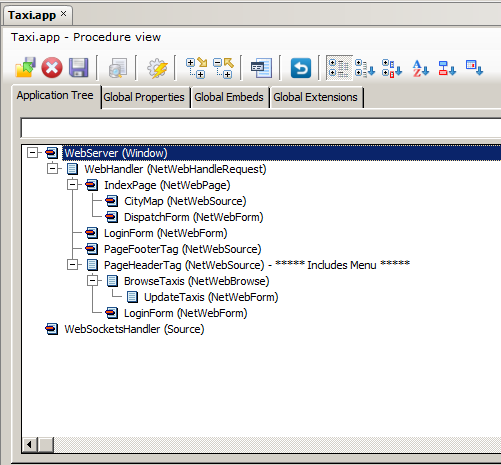
IndexPage
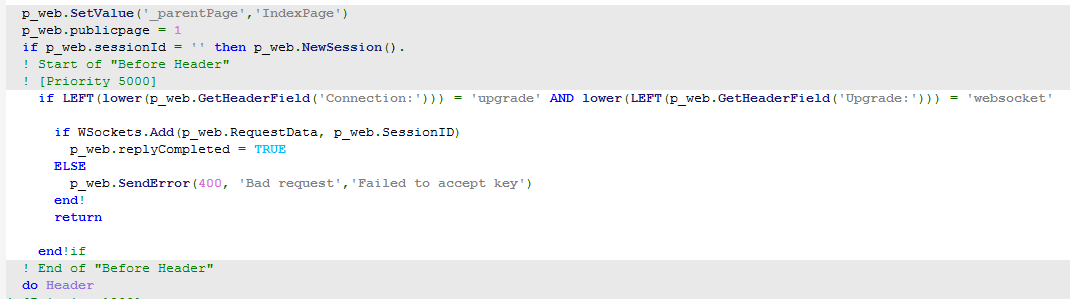
The indexPage contains code to allow a connection to be upgraded to a websocket. To initiate a websocket, a browser will send a normal GET request with some extra HTTP headers. If those headers are present, the IndexPage will upgrade the connection with the webserver to a websocket by calling the Add() method of the global WebSocketServerClass.
CityMap procedure
The CityMap source procedure will load a bit of HTML from disk that contains the map image, a canvas which is rendered on top of the map and a draggable image of a taxi. This procedure also contains a bit of JavaScript that will initialize the JavaScript class that will handle the websocket.
The HTML:
 <div class="map" id="map">
 <img src="images/amsterdam.png" class="mapimage" id="mapimg" />
 <canvas id="others" class="mapimage overlay others"></canvas>
 <img id="me" class="taxi hide" src="images/taxifree.png" draggable="true"/>
</div>
<img src="/images/othertaxi.png" class="hide" id="otherImg">
CSS is used to position the canvas and the taxi image on top of the image with the map of Amsterdam. In cases like this where positioning the elements is critical, I find it easier to write the HTML in an editor and include the contents in NetTalk's response by using the LoadFile method of the packet class:
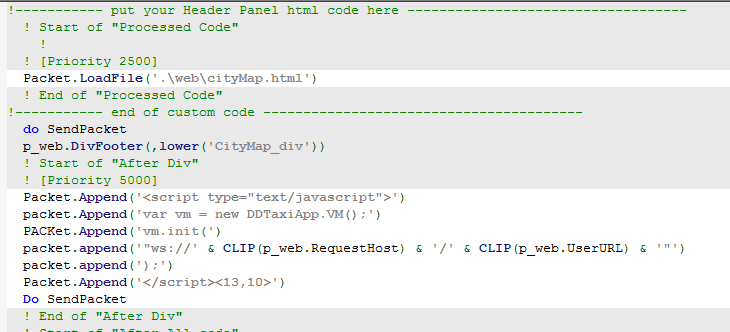
Mind the line that builds the URL for the websocket initialize request. It is a URL that starts with ws:// and then just the regular URL of this particular page. When the browser starts the websocket, a single GET request will be issued to the IndexPage. This GET request will contain extra HTTP headers which will be caught by the code that is embedded into the IndexPage. That code will upgrade the regular webserver-connection to a websocket-connection.
The browser will not receive any data or html automatically. You will have to explicitly send data to the connected client(s). You can easily send data to a newly connected client by embedding code in the WebsocketsHandler as explained later in this article.
DispatchForm procedure
The DispatchForm procedure contains the form to add a new ride. This form is not linked to a table and does not have a regular save button.The 'Save ride' button instead is a button with only a single line of JavaScript attached to the onclick event.
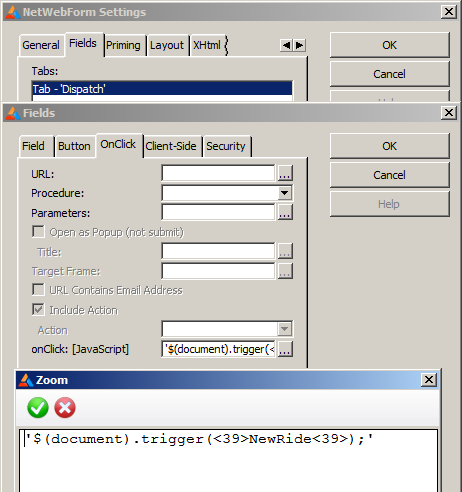
This line of JavaScript triggers a custom jQuery event called 'NewRide'. This event will be picked up by the JavaScript class that handles the websocket. Custom events like this are a very easy way to decouple JavaScript code from the event handling code. Instead of having pieces of JavaScript code scattered throughout the different controls on a page, you can have a single file that contains all your JavaScript code. That drastically improves the maintainability of that code. The only thing you need to do is make sure that you bind code to these custom events:
$(document).bind('NewRide', function () {
 self.$newRideContainer.removeClass("hide");
 });
This tiny bit of JavaScript will remove the CSS class 'hide' from the newRideContainer element whenever the 'NewRide' event is fired. Removing the 'hide' class displays the element, which in this case is the little icon that appears below the newride form. This icon is draggable and allows the user to create a ride by dragging the icon onto the map.
Custom events can be triggered on any DOM element, not just on the document as I'm doing here. It's also possible to include parameters when triggering an event.
The local PersonCount field on this form needs to have server-side validation. The validation will trigger an Ajax request making sure that the server knows how many people are waiting for a ride. We'll see in a bit when this comes into play.
Client side code
The IndexPage also contains two JavaScript files.
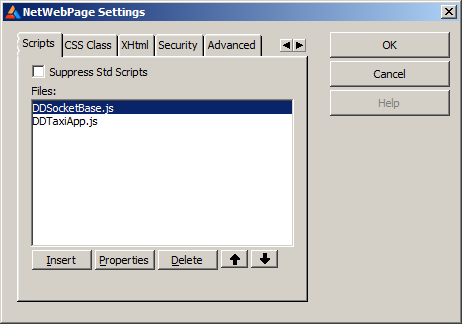
DDSocketBase.js is a helper class for handling a websocket.
DDTaxiApp.js contains the code for this application. It contains a class called VM which is instantiated in the snippet of JavaScript code inside the IndexPage. VM stands for "ViewModel" as used in the MVVM (Model-View-ViewModel) pattern. This pattern is widely used and will improve the maintainability of the code. Immediately after instantiation of the viewmodel, the init method of the VM class is called.
self.init = function (url, mapid) {
  if(!self.inited)
  {
    self.inited = true;
    self.ws = new DDSocketApp.SocketBase(url, self.handleCallback);
    if (!self.ws.supported())
      alert('Websockets are not supported!');
    else
      self.ws.connect();
        //rest of the method is not included for the sake of brevity
   }
}
The important line is where the socket helper class is instantiated into self.ws. The SocketBase class is passed two parameters, the URL of the page containing the upgrade code (IndexPage) and a callback procedure. This callback will be called onopen, onclose, onerror and onmessage, the latter being the event for each message the websocket receives from the server.
The connect() method issues the upgrade request to the URL that is passed into the init method.
The callback method contains a switch structure (JavaScripts equivalent to a CASE) based on the type of event.
//websockets callback method
 self.handleCallback = function (socketEvent, event)
 {
   if (socketEvent == DDSocketApp.MessageEvent && event.data != null) {
   self.log('received: ' + event.data);
   try{
     self.handleMessage(JSON.parse(event.data));
   }
   catch(e)
   {
     self.log('Error handling message! ' + e);
   }
 }
 switch (socketEvent) {
   case DDSocketApp.OpenEvent:
     self.log('opened')
     break;
   case DDSocketApp.CloseEvent:
   case DDSocketApp.ErrorEvent:
     self.log('closed');
     break;
   }
 }
This class only handles the message events. event.data contains the actual message sent by the server. In this particular application, all messages are in JSON format which is why the message is parsed to a JSON structure. The message doesn't have to be in JSON format though, you can just as easily send semi-colon separated strings or whatever else suits you best.
WebSocketsHandler
The WebSocketsHandler procedure is the websocket equivalent of NetTalk's Webhandler. It will be called for every websocket request and can run simultaneously on multiple threads.
The WebSocketsHandler procedure:
WebSocketsHandler PROCEDURE (WebSocketHandler p_handler)
jHandler JSONHandlerjMessage &JSONObject
SendBuffer StringTheory
CODE
 case p_handler.CallbackCode
 OF WebSocketCallbackCode:TextMessage
   jMessage &= jHandler.Parse(p_handler.MsgData.GetVal())
   if ~jMessage &= NULL
     TaxiMap.HandleMessage(p_handler.SockID, jMessage)
   end!If

 OF WebSocketCallbackCode:Close
   TaxiMap.HandleClose(p_handler.SockID)
 OF WebSocketCallbackCode:Open
   TaxiMap.HandleOpen(p_handler.SockID)
 end!case
The code basically delegates calls to the global TaxiMap class which I'll discuss later. The important part here is that the handler receives a p_handler parameter. This is an instance of the WebSocketHandler class which is the equivalent of NetTalk's p_web.
p_handler contains some useful fields such as the socketID (uniquely identifies the (web)socket) and the callback-code. The callback-code identifies what kind of event is being handled. That could be an open event, a close event, an error event or a message event.
p_handler also contains well known methods such as GSV and SSV, mimicking p_web yet again.
But most importantly, p_handler has methods to send messages to the browser that send the message or to all connected browsers.
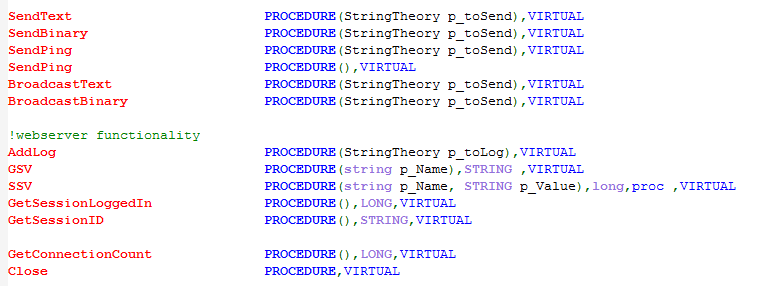
All these methods are threadsafe
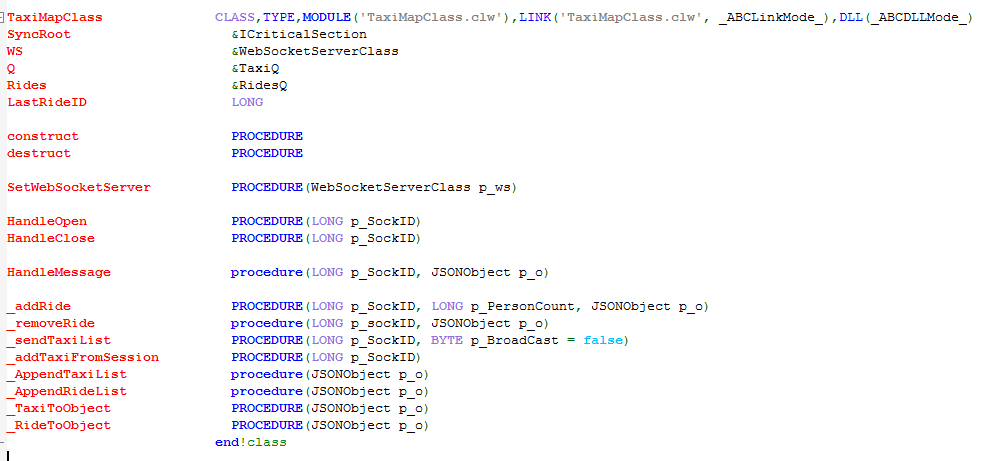
TaxiMapClass
The TaxiMapClass is a global class that wraps two queues and contains the code to send messages to all taxis. One queue contains all taxis, the other queue contains the rides.
The complete code of the TaxiMapClass can be downloaded, see below for details of obtaining the code. But I will include one method here which contains the core of the taxi demo.
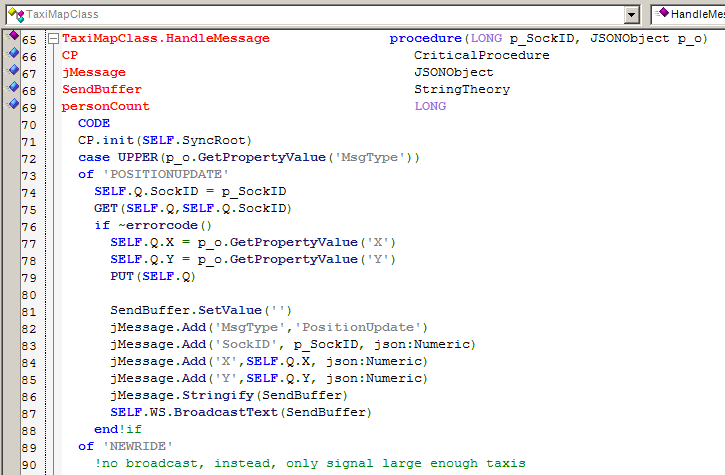
This method will be called for each message that any client sends. In this demo, all messages are sent in JSON format. If the MsgType property of the message contains the text 'POSITIONUPDATE, a taxi has been moved on the map. Using the socketID, we'll get the taxi from the queue and update its position. The new position is then wrapped in a new JSON string which will be broadcast to all connected clients. Every connected client - regardless of whether they have signed in as a taxi - will receive this positionUpdate. New rides however, will only be sent to taxis.
Introducing the websocket templates!
The websocketserver class can easily be added to any NetTalk webserver application by adding the websocket extension template. Since it depends on NetTalk webserver, please make sure you have highlighted the webserver extension template before attempting to add the websocket extension template.
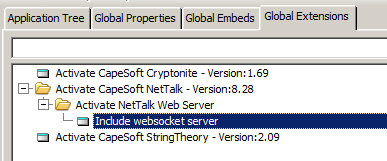
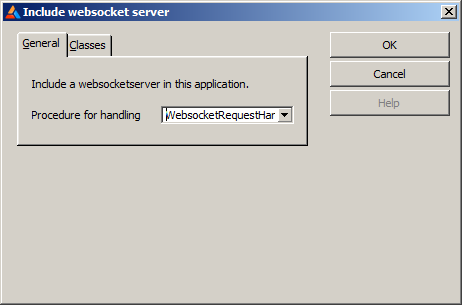
There's only one prompt on the template properties where you can indicate the name of the handler procedure.
The handler procedure will appear as a ToDo procedure. Please generate the app, the handler procedure will then automatically be initialized with some boilerplate code.
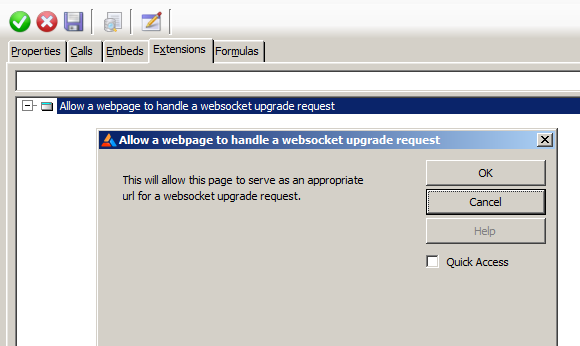
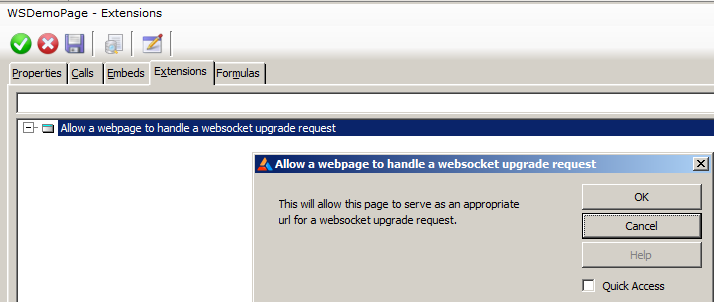
The last step is to add an extension template to the page that will handle websocket upgrade requests. The url of this page will have to be used by the JavaScript which will initialize the websocket.
Your NetTalk webserver is now websocket aware. It doesn't do anything useful though. It just accepts websocket requests and will receive all messages that the attached clients send.
A basic implementation of websockets
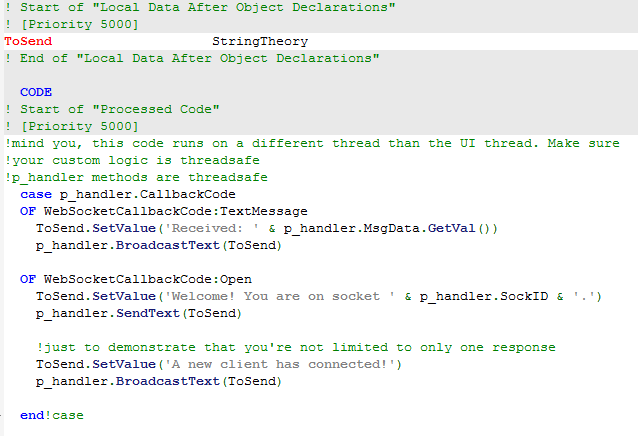
Just embed code into the WebsocketRequestHandler procedure to start leveraging this awesome functionality. Let's do something pretty basic: broadcast all messages to all clients:
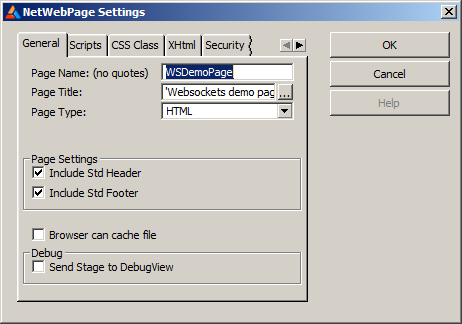
The only thing left to do is to allow a page to open a websocket connection. Typically, you'll use the page where you've added the extension template. However, you can have multiple pages opening websockets. Let's create a new page - called WSDemoPage - for this demo.
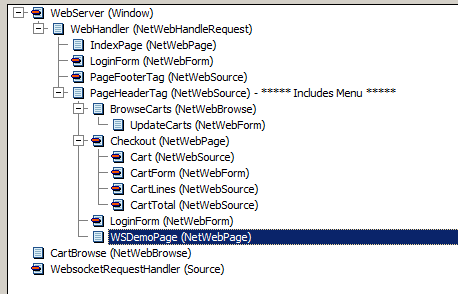
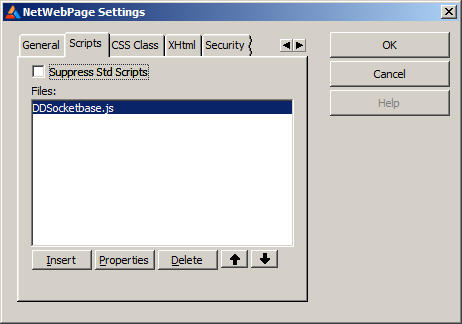
The page will call a form. It also contains 1 JavaScript file and the extension template.
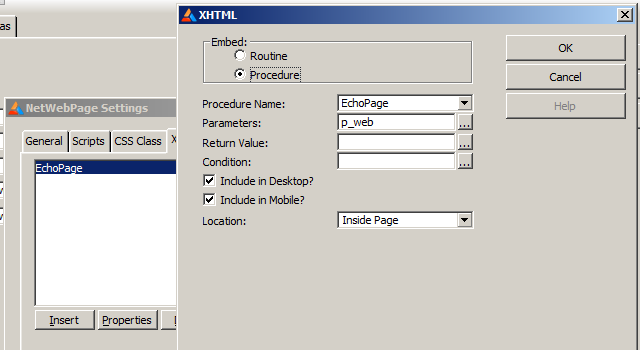
And finally the extension:
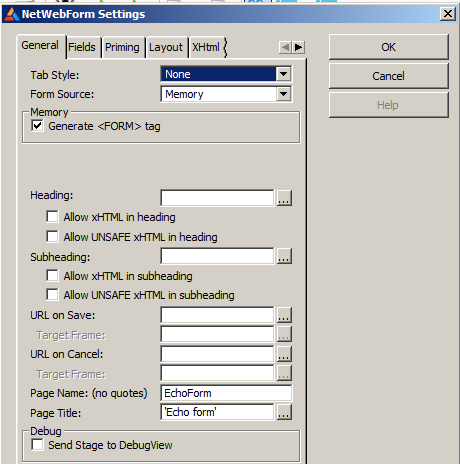
The form properties:
The form will contain three fields: a textbox to allow the user to type a message, a button to send the message to other clients and a textarea that will hold all received messages.
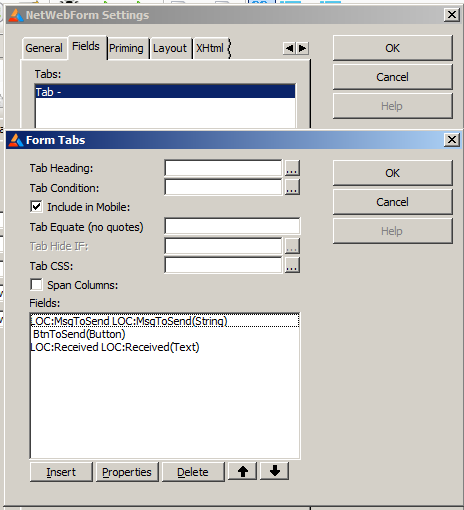
The button properties might need an explanation: the button should not be a submit button, because that will reload the page and disconnect the websocket. After all, the websocket is held by a JavaScript variable on this page. If the page is reloaded, the websocket variable will be recreated.

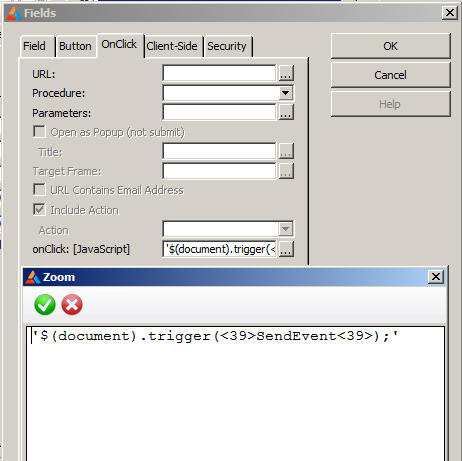
The 'onClick' field contains a single JavaScript line, which will fire a custom event.Just like in the taxi demo.
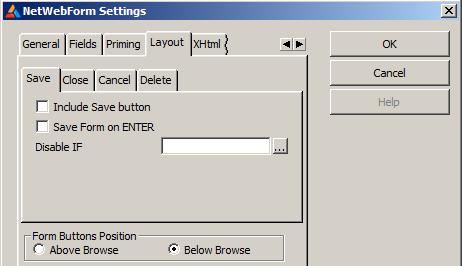
On the layout tab of the form, please uncheck the 'Include Save button' on the Save sub-tab, uncheck the 'Save Form on ENTER' and uncheck the 'Include Cancel button' on the Cancel sub-tab.
Now that the forms UI is done, the last thing to do is to add a bit of JavaScript. I personally prefer to create my JavaScript files in a separate file and then just include the file on the page. I decided to go with embedding the code in the page directly for this demo. The resulting code is more difficult to read in my opinion. But for those of you that are still a bit reluctant to write a separate JavaScript file, I have done it this way. Either way, you'll need to write a bit of JavaScript to start using websockets regardless of where you're gonna put it ![]()
The first embed is only one line:
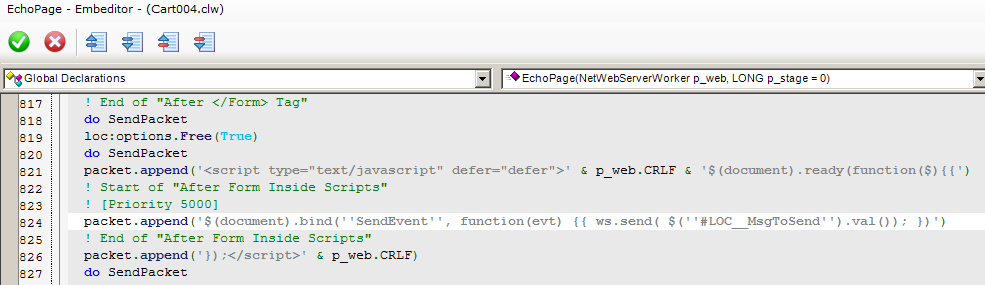
This code is placed inside jQuery's onready function. That means this code will be executed when the page has loaded completely. This line will listen for the custom event that the button on the form will fire. Whenever this listener will be notified of a button click, it will send the text inside the LOC:MsgToSend variable to the server via the websocket.
The second embed contains the initialization code of the websocket and the callback procedure :
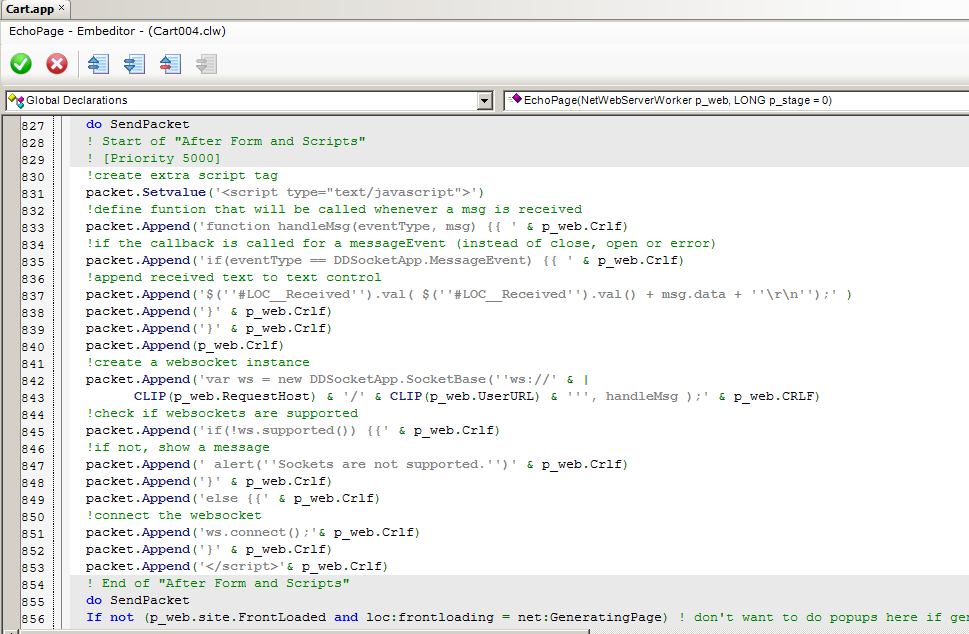
Almost every line has a comment explaining what it does, so the code should speak for itself. This code will generate the following JavaScript:
<script type="text/JavaScript">
function handleMsg(eventType, msg) {
if(eventType == DDSocketApp.MessageEvent) {
  $('#LOC__Received').val( $('#LOC__Received').val() + msg.data + '\r\n');}
}
var ws = new DDSocketApp.SocketBase('ws://127.0.0.1:89/WSDemoPage', handleMsg );
if(!ws.supported()) {
 alert('Sockets are not supported.')
}
else {
  ws.connect();
}
And that completes the app. It should look like this:
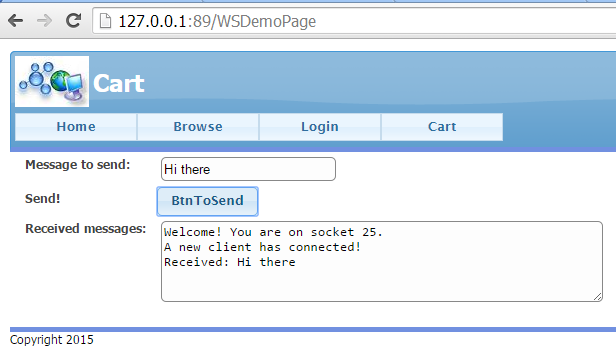
As soon as you open this url in a second browser, this browser window will be immediately notified that a new client has connected. All messages that you send from either window, will appear in both windows. And there you have it, a very simple websocket application!
Want to see more?
This taxi demo and several other demo applications demonstrating some of the use cases for websockets (such as a concurrency checker with an online chatting option, the taxi demo and a shopping cart with online help) are available for download:
I would also like to encourage you to view ClarionLive session #291 that discusses all the demos.
Please note that the download does not contain the websocket classes nor the websocket templates and that you will therefore not be able to compile the demos. The compiled versions of the demos are included, so you will be able to run the demos on your machine.
How to obtain the websockets classes
The websocket classes require NetTalk 8, StringTheory and Cryptonite.
The websocket classes have been licensed to Capesoft and will be part of NetTalk 9, scheduled to be released in 2015.
The websocket classes are available on ClarionShop.com as a pre-release. If you want to start using websockets right away, you can. Please note however, that the classes might be modified by Capesoft to better integrate them into NetTalk. Therefore, there is no guarantee that the upgrade to NetTalk's websocket classes will be seamless.