Creating a document viewer using WinDev functions
by Unknown user
This is a revised and updated version of an article Pete originally posted on his blog.
Early in my career I created a custom document storage solution as part of several of my applications. This led to the Clarion Imaging Templates and later the Imageman Templates, both using third party OCXs. Recently one of those customers wanted some enhancements to their application, and I decided I would rather spend a couple of days converting the application into WinDev than add features in C6 that are built into WinDev.
My first step was to explore the possibilities of using WinDev native functions to create a document viewer instead of using a third party library. I was pleasantly surprised at how easy it was and how much functionality was supported directly by WinDev. The resulting Document Viewer is very light weight and handles most of the normal requirements. It's not as powerful as I would like, but it will do for this project until I create a Document Viewer using a third party .NET library at some point in the future. At the end of the article you will find a download link for the component and the source code.
In this article I will explain the Wlanguage features I used, how to create and use a component, using a floating toolbar, some specific issues with printing multiple page image files (and my work around), as well as some issue I ran into with window position storing functions and how I resolved those.
Requirements
I have the following requirements for the viewer: it has to be able to handle multiple page document files (TIF or PDF), it should be a stand-alone component that can be incorporated into any of my projects, and to keep cost and complexity down it should only use Wlanguage native functions.
WinDev ships with a TIF viewer demo and I used that as a starting point for the project, but there were several issues with it that kept it from fitting my needs. So let’s get started!
Viewer Window
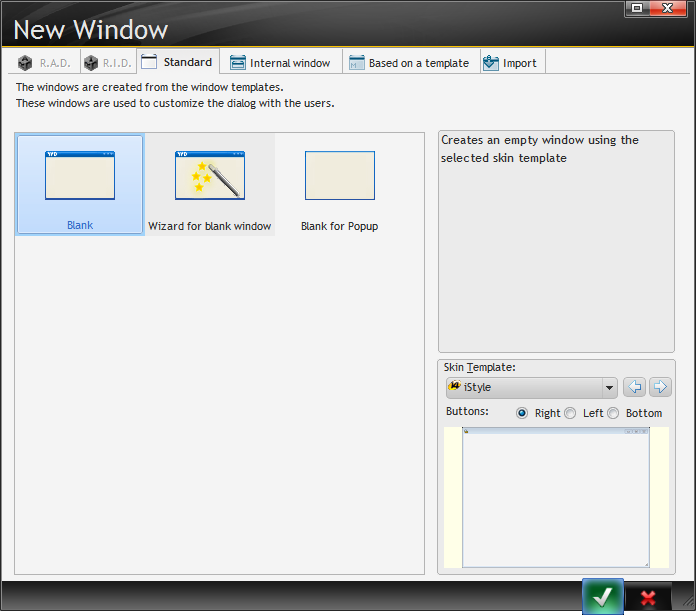
I start with a blank window:
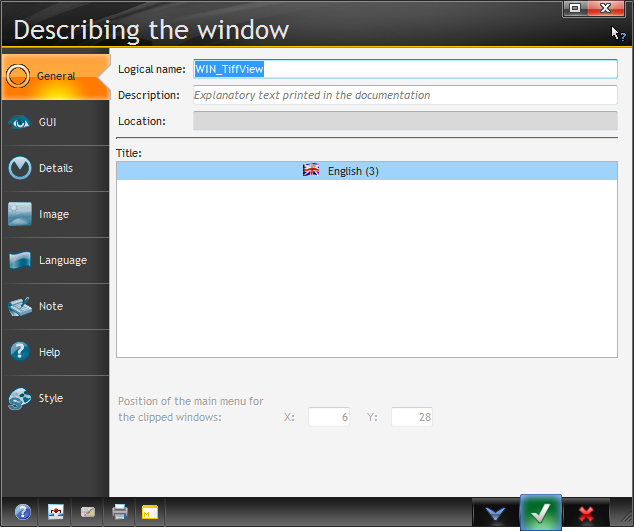
I need to change the window name from the default. I right-click anywhere in the window (the caption bar is handy) and choose Description. From that dialog I can change the Logical name:
The toolbar
I need to add a Floating Toolbar to the Window (I will go over adding the buttons as I go along).
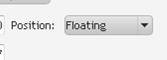
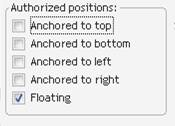
I use the Insert->Toolbar menu to create the toolbar. I set the position to Floating, and I also set the authorized positions to only floating as I do not want this to be a dockable toolbar.

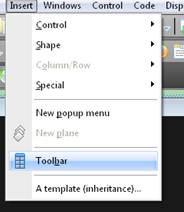
That will create a toolbar window that can be positioned separately from the viewer window. I set the toolbar's name to TBAR_Navigation.
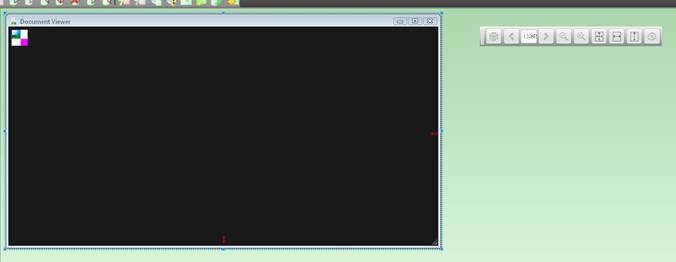
The image control
I also need an image control (called IMV_View) that is using all the space of the window. Here's what my window looks like:
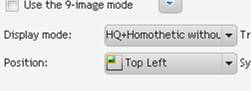
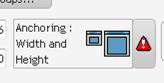
I set the display mode for the image to Homothetic without increasing size, high quality, position to top left, and anchoring to grow both in height and width. These settings assure that the document will always fit the screen when first opened and also whenever the window is resized.
Now that I have the general housekeeping done let’s get to the coding!
Calling the window
First I want to pass the name of the document to display to this procedure; remember I want this to be a stand-alone viewer. So I go to the code of the window and place the following line of code in the Global Declarations:
PROCEDURE WIN_TiffView(gsCurrentFileName is string = "C:\My Projects\DocumentViewer\Exe\LoremIpsum.tif")
The window name is Win_TiffView (which is also the procedure name in WinDev), all I amdoing is creating one parameter for the procedure, gsCurrentFilename, which is a string and has a default value of “C:\My Projects\DocumentViewer\Exe\LoremIpsum.tif”. Now when I open the window I can pass in the name of the document file I want to display. I gave it a default value as it made it easier for me when I was testing the procedure.
Next I have the following code in the Initialization section of the Window:
IF gsCurrentFileName <> "" THEN
   InitImage(gsCurrentFileName)
END

RestoreWindowPosition()

sStoredValue is string
sStoredValue = RegistryQueryValue(ProjectInfo(piRegistry)+ "\" + WinInput() + "\TBAR_Navigation","PositionOuverture")
IF sStoredValue <> "" THEN
   TBAR_Navigation..X = ExtractString(sStoredValue,1,",")
   TBAR_Navigation..Y = ExtractString(sStoredValue,2,",")
END
The first if statement is making sure that I did have a file name passed and if I do it calls the InitImage local procedure (which I haven't yet created). The rest of the code deals with some issues I ran into with the standard WinDev window position restore logic. I will tackle the window restore code at the end of the article. So for now lets look at the InitImage local procedure.
InitImage
Create a new local procedure called InitImage and paste in the following code to replace the generated declaration:
PROCEDURE InitImage(DocumentFileName is string)
gsCurrentFileName = DocumentFileName
IF gsCurrentFileName <> "" THEN
   IMG_View = gsCurrentFileName
   InitTitleBarAndPageNumber()
   TBAR_Navigation..Visible = True
   IMG_View..Zoom = zoomAdaptSize
END
gsCurrentFileName is the parameter that I passed in which also makes it a global variable, so why am I setting it to the DocumentFileName that was passed into the InitImage procedure? As I will show later I want to be able to change the document file that is being displayed without closing and reopening the window, so I will be calling the InitImage procedure from elsewhere to change the document name. This line of code makes sure that I get the correct image name in the global variable.
The IF statement is just my typical belt and suspenders way of coding. The next line sets the image control to the document file passed, this is how the image control knows which file to display. Next I call another local procedure InitTitleBarAndPageNumber which is used to do some house keeping on the toolbar and the window title bar, I will look at that code in more detail in shortly. The next line makes sure that the toolbar is visible.
So does the final line do? Its sets the zoom level of the image. When I started this project I used the properties of the image and the window to figure out the correct ratios and did all the math to figure out what width and height to set the image control so that it would fit the window. Then I remembered what has become the mantra of the Skype WinDev group: “If it seems hard, you are probably doing it wrong!” Sure enough, after some investigation in the help files I found that WinDev has some special constants for the zoom property to make it fit the screen, fit width or fit height. So all I have to do is set the Zoom to ZoomAdaptSize and the document will be resized to fit the current size of the image control.
So let’s take a look at the code in the InitTitleBarAndPageNumber local procedure:
PROCEDURE InitTitleBarAndPageNumber()

IF gsCurrentFileName = "" THEN
   MyWindow..Caption = "Document Viewer"
   RETURN
END

//Display the page number and the total number of pages found in the image file
MyWindow..Caption = "Document Viewer - " + gsCurrentFileName + ": "+ StringBuild("%1/%2 pages",IMG_View..PageNumber, IMG_View..NumberPage)

BTN_PGDN..State = Grayed
BTN_PGUP..State = Grayed
IF IMG_View..PageNumber > 1 THEN
   BTN_PGDN..State = Active
END
IF IMG_View..PageNumber < IMG_View..NumberPage THEN
   BTN_PGUP..State = Active
END
EDT_PageNumber = IMG_View..PageNumber
The first IF statement checks that I have a filename and if I do not then it sets the title bar of the Window to “Document Viewer” and exits the procedure. If I do have a document name, then the next line changes the title bar to show the document name and which page is being displayed, and the total number of pages in the document. The PageNumber property of the image control contains the current page being displayed and the NumberPage property contains the total number of pages of the image. Not the best naming convention and I predict that like me you will probably mix that up a few times before it sticks. The StringBuild function is a very handy string function of WinDev that makes it easy to build strings containing several variables, and I strongly suggest you learn more about it via the help files.
Next I disable both the Page Up and Page Down buttons and then reenable them based on what page of the document I am currently displaying and how many pages are in the document. And then finally I update the edit control with the current page number displayed.
The toolbar
All that’s left for the viewer window is to add some buttons to the toolbar and place some code on them. Adding controls to the toolbar is like adding them to a window, except the controls automatically position themselves. It takes a little getting use to but once you use it for a few minutes, it makes sense. If you struggle with it, leave a comment and I will be glad to try to help you over the hurdle.
So what features are I going to have on the toolbar? Print, Page Up, Page Down, displaying the current page and allowing the user to jump to any page, zoom in, zoom out, fit to screen, fit to width, fit to height, and close the viewer window. In an ideal world I would also like to include rotate left and right functions. Unfortunately, although version 16 has added Rotate functions for images they don’t seem to work reliably with multiple page image files. There is also a demo app that uses the Windows API to rotate an image file, but again this does not seem to work reliably with multiple page images. This is one of the main reason that I will likely have to recreate this viewer at some point in the future using a third-party .NET library.
I'll come back to the printing button later. First let's take a look at the Page Up and Down buttons.
The Page Up code
Here's the page up code:
IF IMG_View..PageNumber < IMG_View..NumberPage THEN
   IMG_View..PageNumber ++
   InitTitleBarAndPageNumber()
END
The Page Down Code
IF IMG_View..PageNumber > 1 THEN
   IMG_View..PageNumber --
   InitTitleBarAndPageNumber()
END
The code behind these buttons is very similar. The IF statement makes sure that I don’t go lower than page 1 or higher than the total number of pages in the document. The ++ and — are short hand syntax used in WinDev to subtract 1 or add 1 to the variable. It's the same as the statement: Variable = Varible + 1. The PageNumber property as you remember is the current page displayed; by changing this property I change the page being displayed. I also make a call to the InitTitleBarAndPageNumber local procedure to do the housekeeping on the Window title bar and toolbar controls.
By using an edit control to display the current page number not only can I display the page number, but I can also allow the user to type in a page number and jump to that page. To accomplish that I add the following code for the edit control
IF EDT_PageNumber > 0 AND EDT_PageNumber InitTitleBarAndPageNumber()
END
Again the IF statement makes sure that the user does not enter an invalid page number. As long as they have entered a valid page number, I change the PageNumber property to the value entered and call the InitTitleBarAndPageNumber local procedure to do the housekeeping.
The Zooming code is all very simple code, consisting of one line each.
Zoom In Code
IMG_View..Zoom = IMG_View..Zoom * 1.5
Zoom Out Code
IMG_View..Zoom = IMG_View..Zoom / 1.5
Fit to Screen Code
IMG_View..Zoom = zoomAdaptSize
Fit to Width Code
IMG_View..Zoom = zoomAdaptWidth
Fit to Height Code
IMG_View..Zoom = zoomAdaptHeight
All of these use the Zoom property. The Zoom In and Out function simple increase or decrease the zoom by a factor of 50%, and all three of the Fit buttons use the special WinDev constants that I already discussed to display the image as desired. Again I can not emphasize enough how incredible these special constants are!
And finally the close button, calls one line of code to close the viewer window.
Close()
Printing
The example application that comes with WinDev creates a JPG file for each page of the document and then prints them directly. Regardless of the format chosen (JPG, BMP, etc) the quality of the document is reduced, which would not work for my needs. So instead of using direct printing I am going to use a report. WinDev has the ability to use a PDF image as the background image of the report and chose which page to print, so I can use that ability to print the image. This still left me with a few issues. First my documents are stored in TIF format not PDF, and WinDev does not support using a multiple page TIF file as the background for a report; regardless of the PageNumber property it always prints page 1.
The other issue I ran into is that WinDev really intends for the multiple page PDF to be used as a report background when printing forms with the data overlaid. This means that they intended for you to set the PDF at design time not runtime, I got a few odd results because of this, so i got around this by creating a blank two page PDF file and using this as the background of the report.
Let's look at the code behind the print button first then I will move on to the Report procedure itself.
ImageInfo, Format are strings

ImageInfo = BitmapInfo(gsCurrentFileName)
Format = ExtractString(ImageInfo, 1)

IF Format = "TIF" THEN
   fDelete("printtif.pdf")
   IF NOT ExeRun("""" + fCurrentDir() +["\"]+ "Tiff2PDF.exe"" -o printtif.pdf -p A4 """ + gsCurrentFileName + """",exeIconize,exeWait) THEN
      Error(ErrorInfo())
   END
   iPreview(iPage,"Document Print")
   iPrintReport(RPT_PrintImage,fCurrentDir() +["\"]+ "printtif.pdf",IMG_View..NumberPage)
   fDelete("printtif.pdf")
ELSE
   iPreview(iPage,"Document Print")
   iPrintReport(RPT_PrintImage,gsCurrentFileName,IMG_View..NumberPage)
END
The BitmapInfo function returns a tab delimited string containing several pieces of information about an image file. The first piece of information is the Format of the Image. I use the ExtractString function to return the value in position 1 of the delimited string. ExtractString is another one of those handy WinDev functions that I strongly encorage you to read up on; it allows you to pull a value from a delimited string from any position in the list. You can specify the character used to delimited the string (e.g. tab,comma,semicolon,etc).
The IF statement test if the format of the document is TIF; if it is then I first delete the file “printtif.pdf” from the disk. Again this is my Belt and Suspenders style of coding, I just want to make sure the image has been deleted so it won’t give me any trouble in the next statement.
The next statement is calling a command line utility to convert a TIF image into a PDF image and naming the converted file “printtif.pdf”. EXERUN calls an external EXE and returns an error code if the command could not be ran. The fCurrentDir() function returns the current path of the application, which unless it has been changed elsewhere is where the .EXE is located. The rest is just building the string for the actual call to the command line utility. The exeIconize constant tells WinDev that I would like the command to open not as a window but just as an icon on the taskbar, and the exeWait constant says that I want to halt execution of the application until the command line function finishes.
Next I set up the report to be displayed in the print preview and call the Report procedure with the name of the file and the number of pages in the document. In this case I pass in the “printtif.pdf” file name that I just created via the utility. I pass the total number of pages. Because WinDev does not expose the NumberPage property for the background image of the report, I get it from the property of the image control and pass it to the report. And then finally I delete the “printtif.pdf” file yet again. What can I say, Belt and Suspenders has never failed me!
If the document is already in PDF format I can skip all the extra steps and just set up the report preview and call the Report procedure with the name of the document file and the number of pages.
Print Document Procedure
For the report procedure I create a report with no margins and just a body block. I set the background of the Report to the blank PDF mentioned earlier, and set it to use page 1.
In the opening code of the Report I redefine the procedure to accept the two parameters that I am going to pass (the Document File Name and Number of Pages), I also change the background image to the document file passed. You should notice that although I set the background image on the Report properties, the run-time property is actually associated with the Body block.
PROCEDURE RPT_PrintImage(ThisReportImage is string,gnPages is int)
RPT_PrintImage.BODY..Image = ThisReportImage
At this point the report runs and prints the first page. In order to print the remaining pages of the document I add the following code to the Closing section of the Report
IF gnPages > 1 THEN
   nCount is int
   HourGlass(True)
   FOR nCount = 2 TO gnPages
      RPT_PrintImage..PageNumber = nCount
      iPrintBlock(BODY)
   END
   HourGlass(False)
END
The IF statement makes sure that I have multiple pages. If I do have multiple pages, I set the cursor to an hourglass, and loop from 2 to the total number of pages, changing the “PageNumber” property and reprinting the body block. Once completed I return the cursor to its normal state.
Global Procedure to Manage the Viewer Window
I now have both the viewer window and report and I am almost finished. Since I want to have the ability for the viewer window to stay open as I call it with different document files, I am going to create a global procedure to manage the call to the viewer window.
PROCEDURE DisplayDocument(DocumentFileName is string)

IF WinStatus(WIN_TiffView) = NotFound
   OpenSister(WIN_TiffView,DocumentFileName)
ELSE
   WIN_TiffView.InitImage(DocumentFileName)
END
This procedure accepts the document file name as a parameter. The IF statement checks to see if the Window is already open. If the window is not open I open it using the OpenSister function, passing the document file name as a parameter. The OpenSister function opens a non-modal Window that can be interacted with separately from the current window. This allows me to have the document viewer open on a second monitor and display the related document as I scroll through a list of documents displayed in the main window on the first monitor.
If the Window is already open I call the InitImage local procedure of the window to change the image displayed. By using the context WindowName.LocalProcedureName I can call the local procedure of a window from elsewhere in the code, I can also perform actions on the controls of another window using the WindowName.ControlName syntax. Once mastered this ability opens up a world of possibilities for a WinDev developer.
Technically in today’s world I should have created this as a class instead of a global procedure, but its a simple one line procedure call and let’s face it I am an old school guy that goes for the simple and obvious solution when available.
Saving and Restoring the Window Position
WinDev offers the functionality to save the window position and size and then restore it at run-time by simply selecting a few options on the windows properties. This allows your application to remember the position and size of a window if the end-user resizes or moves the window. This seems to work well, unless the end-user is using dual monitors. For a document storage and viewing application, dual monitors are very helpful and allow you to have the viewer open on one monitor while working with the data on the other. Using the standard WinDev functions, my viewer window was not remembering to open on the secondary monitor. After some experimenting I created my own functions for storing the windows position and restoring it, and I'll write about those soon.
Creating a Demo procedure and executable
In order to demo and test the viewer I created a simple procedure with few buttons on it to view documents and close the viewer. There's nothing special there and I won’t go over the code, although it is included in the project for your use. At this point you can create an executable for the project the same as you would any other project. Again I won’t go in to the steps of how to create an executable. So go ahead and create the executable and play around with the interface.
Creating a Component
So now I have the handy viewer procedure and report and I could simply copy this into every project I need to use it in. But, what happens when I decide to add a feature to the document viewer? I would have to modify the procedure in every project. To avoid this issue I will create a Component. This is very similar to a .DLL, except it allows us to include documentation and store the component in the SCM so that it will automatically be updated in all of the projects when it is changed.
More on that next time.