Creating a process without creating a process
Clarion's process template is a great tool for any kind of procedure that requires stepping through a filtered or unfiltered set of records. A little while ago I had a request to extract some data from a file, simply by stepping through records in primary key order, and my first thought was to go with a process template. But I also had a requirement to potentially restrict the records to a specific range of primary key values. So that meant popping up some kind of window to collect filter values.
As I was processing records in primary key order I decided I could do everything more simply with a window procedure. And it turned out to be even easier than I expected, thanks to some useful progress bar property statements. I'll get to those a little later.
In this article I'll show how to add a similar procedure to the venerable People.app.
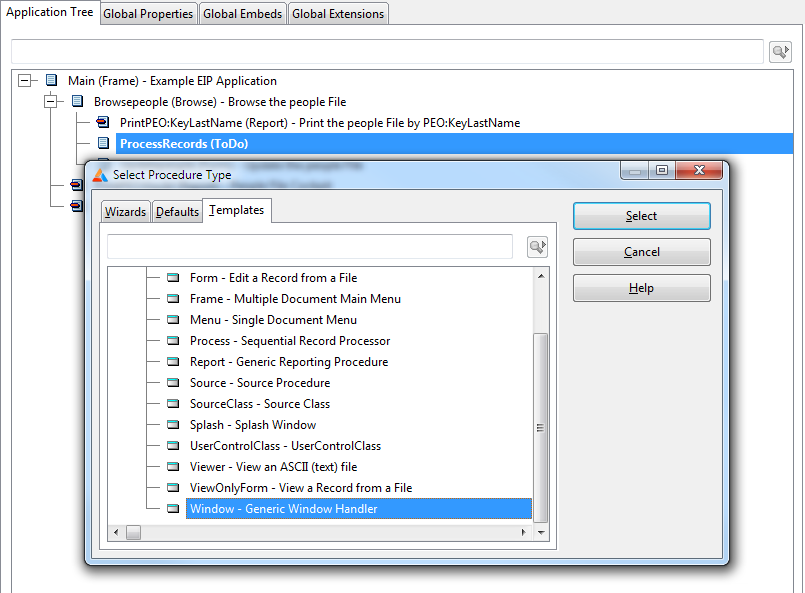
I start by adding a button to the browse from which I want to call the export process. (I won't actually do any exporting in this example; instead I'll just display data from the records I process.) I set the Action of that button to call a new procedure, which I create using the Window template. Feel free to use the Window wizard if you're more comfortable with it - the only difference is that the wizard lets you set styles and will create the window for you; with the template you'll create the window the first time you go to the window editor.
I need the following elements on the form:
- a starting primary key value
- an ending primary key value
- a progress bar
- a start button
- a cancel button
and just for fun:
- a pause button
Here's the form with the UI elements complete:
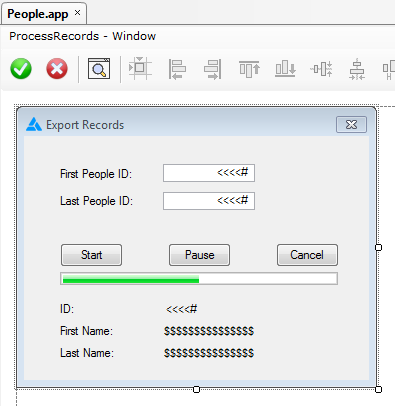
Since this process won't do anything other than loop through the records (the XML export that inspired the original procedure is outside the scope of this article) all I'm doing is displaying the current record on screen.
Changing control types
If you have entry fields you'd rather show as strings on a window, populate them as you normally would. Then use the ellipsis button to edit the window definition directly.
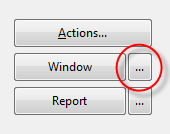
Simply change the ENTRY to a STRING - everything else on the line can stay the same.

Once you get comfortable with Clarion Window structures you can make all kinds of changes. One I make regularly is change entry fields to spin boxes. It's less work than populating a new control and changing the use variable.
Using a timer
Looping through records in a tight loop with no possibility of interrupting the loop is almost never a good idea unless you are only dealing with a handful of records. Clarion reports and processes avoid this problem by using a window timer and looping through a smaller number of records on each timer event. In between these processing loops the UI can respond to user input.
I'm going to use a similar approach, which means I need to be able to put code into the Event:Timer embed. And that embed only appears when the window has a Timer attribute. Any non-zero value will do.
Setting up for sequential processing
When the window opens up, any timer event code will execute because of that required Timer attribute. So I need to disable the timer. Right after Self.Open(WINDOW) I add this code:
0{prop:timer} = 0
The value of 0 before the property assignment means I am assigning to the currently active window. I could also use
Window{prop:timer} = 0
but "0" takes less typing. And if you're ever writing code that needs to apply generically to a window using 0 means you don't need to know the window label.
I have a little more setup code that executes around the same time (actually just before opening the window):
    FirstPeopleID = PEO:ID
    clear(PEO:ID,1)
    set(PEO:KeyId,PEO:KeyId)
    previous(people)
    if errorcode()
        LastPeopleID = 0
    else
        LastPeopleID = PEO:Id
    end
    clear(PEO:RECORD)
This code:
- assumes the first record I want to process is in memory, and saves the ID of that record in FirstPeopleID
- primes LastPeopleID with the hightest ID in the file
- clears the record so nothing displays when the window first opens
Using timer events
Here's the Event:Timer code (I'll explain the use of PROP:Progress in a moment):
        next(People)
        if errorcode() or PEO:Id > LastPeopleID
            0{prop:timer} = 0
            post(event:closewindow)
        else
            ?Progress{PROP:Progress} = PEO:Id
        end
When the start button is clicked this code executes:
        TimerInterval = 50
        PEO:Id = FirstPeopleID
        set(PEO:KeyId,PEO:KeyId)
        0{prop:timer} = TimerInterval
        ?Progress{PROP:RangeLow} = FirstPeopleID
        ?Progress{PROP:RangeHigh} = LastPeopleID
        disable(?StartButton)
        enable(?PauseButton)
First I set a local variable which is the value that will be applied to Prop:Timer. There are two places this happens (as you'll see); I use a local variable so that if I want to change the value I only need to do so in one place. A value of 50 means the timer will execute every half second, which is probably a lot less frequent than I'd really want it to happen but it allows the process to execute at a good demonstration speed. I'll also only be processing one record per timer event.
I then do a Set in primary key order on the People file.
Displaying the progress bar
This is the bit I really like about this whole procedure. By default, progress bars have a range of values from 1 to 100, and if you want to use that range and you don't have exactly 100 records you need to do some math.
?Progress{PROP:RangeLow} = FirstPeopleID
?Progress{PROP:RangeHigh} = LastPeopleID
The RangeLow and RangeHigh properties let you set the lower and upper boundaries to whatever value you like. Because I'm setting the low value to the first primary key value, and the high value to the last primary key value, all I need to do to display the progress bar is set PROP:Progress to the current primary key value (as shown earlier):
?Progress{PROP:Progress} = PEO:IdI'm not sure just how big RangeHigh can get, but I've tried it with the maximum LONG values and it still works, so if you're using LONGs for primary key values you needn't worry.
Pause and Cancel
There are two more events I need to respond to: Pause and Cancel.
The Cancel button code is simple - just disable the timer and post a CloseWindow event:
        0{prop:timer} = 0
        post(EVENT:CloseWindow)
The Pause button code is more elaborate, as I want to be able to toggle the button text between 'Pause' and 'Resume'. This is also the second place where I use the TimerInterval variable.
        if ?PauseButton{prop:text} = 'Pause'
            if 0{prop:timer} > 0
                0{prop:timer} = 0
                ?PauseButton{prop:text} = 'Resume'
            end
        else
            ?PauseButton{prop:text} = 'Pause'
            0{prop:timer} = TimerInterval
        end
Summary
Although I could have used a Process template in this situation, with relatively little code I have achieved the following:
- Easy selection of range limiting values
- Accurate progress bar display
- The ability to pause the process
This technique works best on sequentially numbered single component keys, such as primary keys, although with a bit of work you might be able to adapt it to other situations.
And of course this was a one-off job; if I come across other places where I need something similar I'll look into creating a class and/or a template. But sometimes a little hand code goes a long way.