A server side autoincrement template
by Unknown user
One of the biggest challenges for me when I moved my application from a Topspeed database to a MS SQL Database was the auto numbering of a key. In a Topspeed database you don't even think about auto-numbering because everything happens automatically. The auto-numbering on a MS SQL table, if configured, is automatic as well but to get the auto number back into your code is a mission. But not anymore! Clarion 10 has finally come up with an easier solution to the problem.
Over the years there were a couple of articles written on the subject and below is a list of some of the articles.
- Using SQLIdentity in Clarion 6
- SQL Identity: Another Approach
- Multi-User Primary Keys: A Solution
- Introduction to SQL - Part 4
- Auto-Numbering in SQL – An Overview
- Auto-Numbering in SQL – PostgreSQL
I have been looking for a solution to get the MS SQL auto number, or identity number as it is called in MS SQL, into my code for many years. The solution I used was to create a record with a store procedure and then the store procedure would return the auto number to the Clarion code. This process meant I had to change the code in many of my update procedures due to the fact that I have to track if the user cancels the insert so that I can delete the record that was created by the store procedure. This approach was only required where I had to know the auto number for subsequent inserts of child records.
Then recently SoftVelocity made the following statement in the Clarion blog - Some highlights for the C10 release :
MSSQL Driver
Now you can get the MSSQL driver to use SCOPE_IDENTITY to retrieve server identity values by adding /AUTOINCUSESSCOPEIDENTITY=TRUE in the driver string
After reading the statement I immediately decided that I am going to create a test app and test this new functionality but as always when you start with something new the best place to start is with the documentation.
The first step was to open the Database Drivers manual and look for the section called Server Side Auto incrementing. There is a lot of information in there but you only need to understand one or two things.
The first thing that you need to understand is a file property called PROP:ServerAutoInc. The following is quoted from the help file:
PROP:ServerAutoInc
This property is READ/WRITE. To make the driver automatically update fields after an ADD or APPEND call (or before in some cases) you need to issue the following statement
file{PROP:ServerAutoInc}
before issuing the ADD(file) or APPEND(file). This property is a flag that is reset by ADD and APPEND. So it must be reissued each time an ADD or APPEND is done.
To specify which field is actually set on the server, you need to issue the following statement:
file{PROP:ServerAutoInc, n} = m
where n is the field number and m is the column number of the returning SQL code. This is almost always 1.
You only need to set the value of {PROP:ServerAutoInc, n} once for non-threaded files and once per thread for threaded files.
You can query PROP:ServerAutoInc to see if the next ADD or APPEND will do a server side auto increment or to verify that a field is set to receive the results of the auto increment.
I think an example is in order here. Lets assume you have a table called Branch and the Table looks something like this:
Branch               FILE,DRIVER('MSSQL','/AUTOINCUSESSCOPEIDENTITY=TRUE'),OWNER(GLO:DBOwner),NAME('dbo.Branch'),PRE(BRA),BINDABLE,THREAD
PK_Branch                KEY(BRA:SYSIDBRANCH),PRIMARY
Record                   RECORD,PRE()
SITE                        CSTRING(5)
SYSIDBRANCH                 LONG
BRANCH_CODE                 CSTRING(31)
BRANCH_NAME                 CSTRING(101)
                         END
                     END
Taking the above table definition into account the PROP:ServerAutoInc command will look like this:
Branch{PROP:ServerAutoInc,2} = 1The command looks like that due to the fact that the column in the table that will receive the auto number from MS SQL is the second column. The first column is a column called Site and the SysIdBranch that will receive the auto number is the second column.
The second thing that you need to understand is a driver string called /AUTOINCUSESSCOPEIDENTITY=TRUE. The following is quoted from the help file:
AUTOINCUSESSCOPEIDENTITY
As of Clarion 10, If you add the driver string /AUTOINCUSESSCOPEIDENTITY=TRUE to the driver string of a file, the driver will use SCOPE_IDENTITY() using the same statement handle as the INSERT to retrieve the auto-incremented value.
In the past Clarion has had support for @@IDENTITY, which isn't 100% reliable as it returns the last autoincrement ID for the current connection. If you create a record, and in doing so you fire off a server side trigger that creates yet another record, you'll get that record's ID not the one you want. SCOPE_IDENTITY() always returns the autoincrement ID for the record you just created, no matter what else may happen on the server.
Let’s see where you would use /AutoIncUsesScopeIdentity in your dictionary.
Dictionary changes – Table – Driver Option
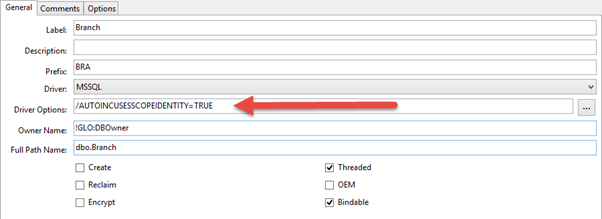
Click on a table in your Dictionary and look at the Driver Options. In Figure 1 you will see the /AutoIncUsesScopeIdentity has been completed already.
Figure 1
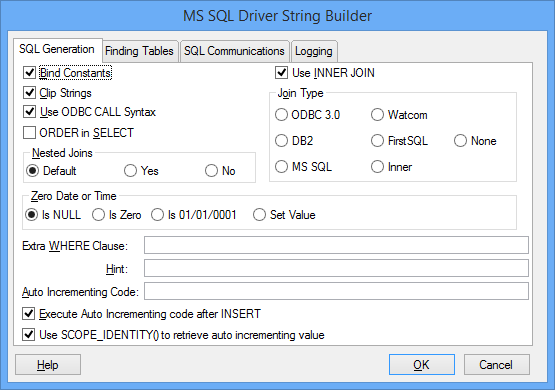
If you can’t remember the exact wording to type in just click on the button to the right of the field and the screen in Figure 2 will be displayed.
Figure 2
In Figure 2 above you can just click on “Use SCOPE_IDENTITY() to retrieve auto incrementing value” and it will auto populate the /AutoIncUsesScopeIdentity for you.
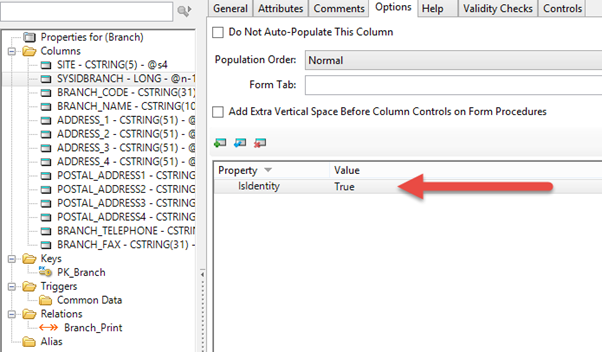
There is one more change that you have to make to your dictionary otherwise the auto-increment won't work. Open your Table and click on the column that will receive the auto number, then click on the Options Tab.
Figure 3
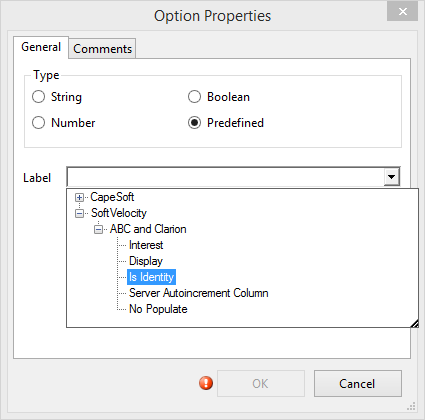
When you click on the add button under the column options tab you will be presented with the image as in Figure 4. Open the SoftVelocity tree, then "ABC and Clarion" and choose the "Is Identity" option.
Figure 4
This tells Clarion that SysIdBranch is the column that will receive the auto number value.
Ok, that takes care of the changes that you have to make to your data dictionary. Remember that you will have to do this to each table where you want to get the auto number back into your code at time of the insert.
Now lets look at the changes you have to make to each update procedure where you want the auto increment to work.
Changes to the Update Procedure
The first bit of code that needs to be added is in the Init embed. As discussed earlier the following statement informs Clarion that the second column in the table will receive the auto number from MS SQL.
ThisWindow.Init PROCEDURE

	!Only have to do this once in this thread
	Branch{PROP:ServerAutoInc,2} = 1
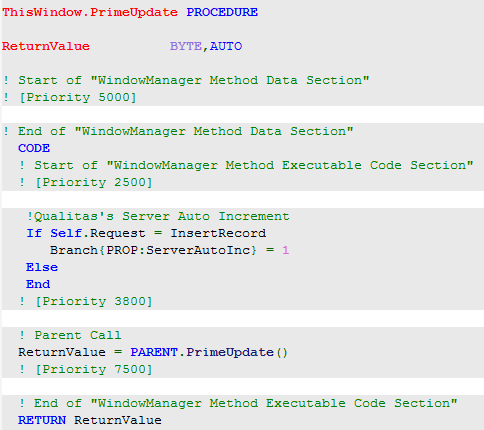
The second block of code that needs to be added is in the PrimeUpdate embed
ThisWindow.PrimeUpdate PROCEDURE

	!Have to do this before every Insert
    If Self.Request = InsertRecord
       Branch{PROP:ServerAutoInc} = 1
    Else
    End
Remember from the help: This property is a flag that is reset by ADD and APPEND. So it must be reissued each time an ADD or APPEND is done.
This is not a lot of code to add but I know what typically happens to me. After a month or so I am not going to remember which code needs to go where and I will have to remember where I used the code last so I can copy and paste the code again. So the solution to this is a template! I am not going to go into the template code, it is simple enough if you want to have a look at it. I am rather just going to explain how to use the template.
Template
The first step is to copy the template file qsServerAutoInc.tpl to your \Clarion10\accessory\template\win folder and register the template in Clarion 10.
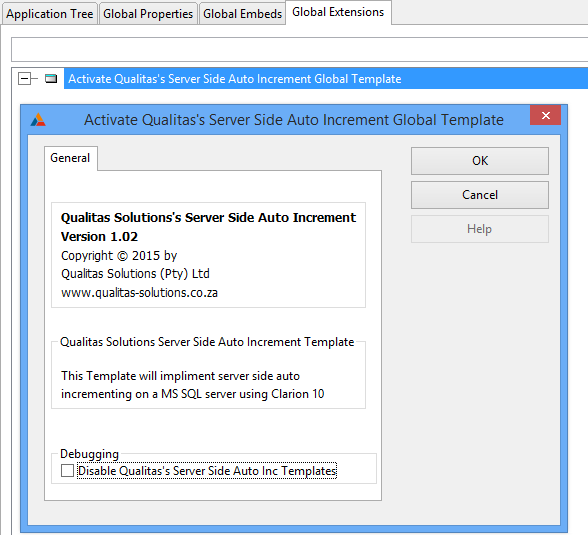
The template consists of a Global Extension and a Procedure Extension.
Figure 5
The second step is to open your application and register the Global Template.
Figure 6
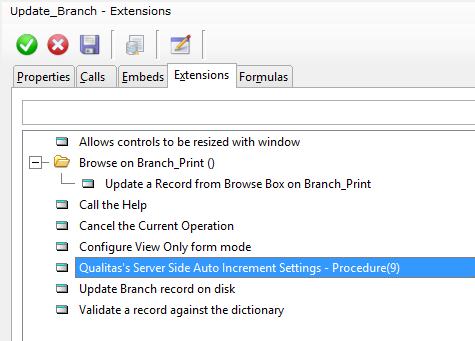
The next step is to add the Template to your procedure and complete two questions.
Figure 7
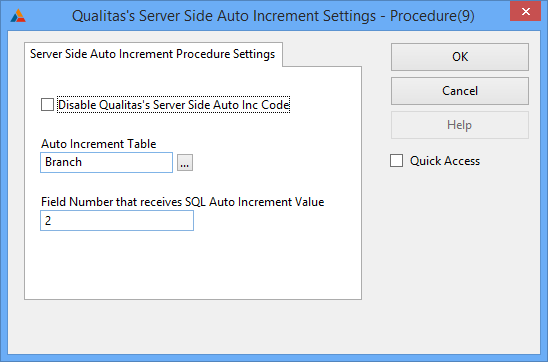
The first question you need to answer is which Table you want the auto increment to work on and the second is which column will receive the auto increment value.
Figure 8
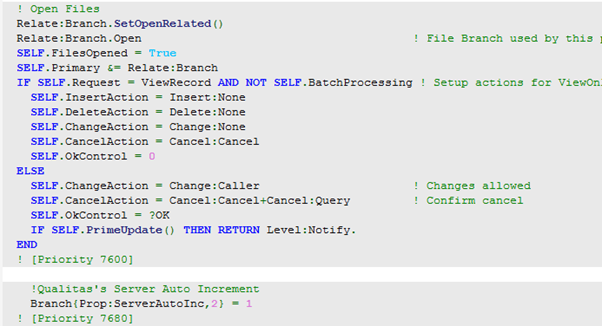
Now what does the code look like that is generated by the template? In Figure 9 you can see the code in the Init embed, just after the Open Files section.
Figure 9
And in Figure 10 is the code generated in the PrimeUpdate embed.
Figure 10
This means that right after the insert command you can know the value of your auto number column.
For example if you execute the following code the message will display the auto increment number for SysIdBranch which is wonderful news because now you can add your child records immediately. But of course you don't want to leave a Message() statement like this in a production app!
    If Access:Branch.Insert = Level:Benign
       Message('SysidBranch = ' & BRA:SysIdBranch)
    Else
    End
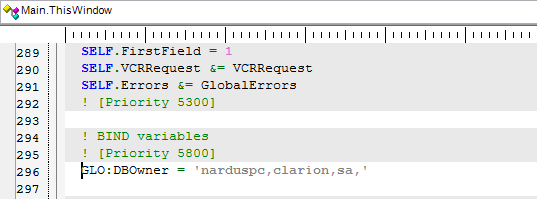
In the attached example application remember to change the DBOwner string as needed before you compile and run the app.
Figure 11
Conclusion
Clarion 10's support for SCOPE_IDENTITY() is a significant improvement over @@IDENTITY, but getting the code right can still be a chore. With this template you can get the job done easily, quickly and reliably.
Files
